Departmental Customer Upload Enhancements in Third Quarter 2021
The Customer Upload feature has been enhanced and reorganized.
This article covers the special “subfolder” customer upload option.
Enhancements and settings for the main Customer Upload settings and options found in Group Administration –> Group Settings –> Customer Upload are described in this article.
The My Docs Online Customer Upload feature includes the ability to create “departmental” subfolders under \Customer Upload with unique links using the f= parameter or a folder-specific URL that never changes. The feature is usually coupled with folder permissions and notification options associated with a particular Login ID.
These links also include the ability to customize the upload form separately from the main Customer Upload link and other “departmental” links.
Although all Customer Upload forms share the same custom logo, all other fields and options are now unique to the subfolder, including instructions, optional fields, prompts, file type rules, and more.
To set up a departmental upload link and customize it follow these steps:
login with your Administrator ID using the browser interface
Open the \Customer Upload folder (if you don’t yet have that folder create it with “Create Folder” and then open it
While in \Customer Upload use “Create Folder” to add the departmental folder
Select “Details” from the Action menu for the departmental folder
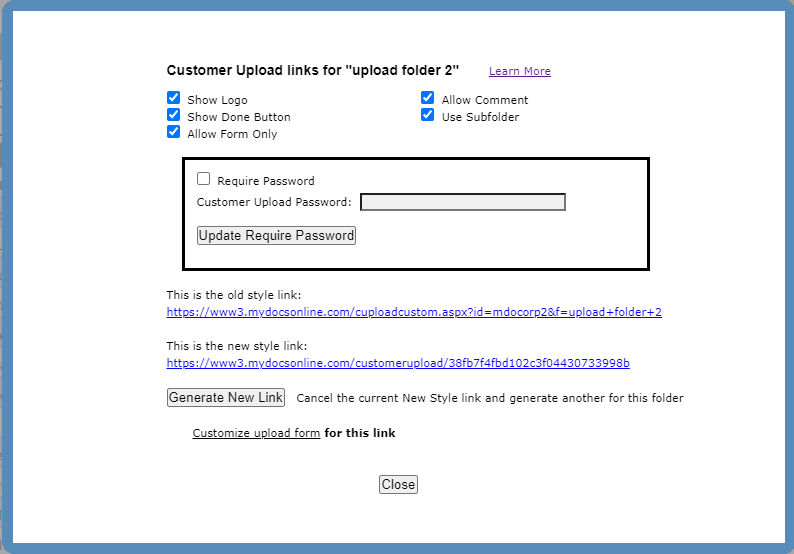
The optional features include:
Show Logo. If checked (the default) your logo or the My Docs Online logo (if you have not customized your Customer Upload form) will be displayed at the top of the upload page, If unchecked no logo appears. This is to support “embedding” the form in a page oon your website as described in this article.
Show Done Button. If checked (the default) a button labeled “Done” will display after initial file(s) are uploaded, allowing the user to select more files for upload. If unchecked the upload will complete immediately after the first file(s) have been uploaded. This is a rarely used option.
Allow Form Only. If unchecked (the default) only files can be uploaded, with details from the upload form made available if you select “details” from the Action Manu for any files uploaded. If checked the customer can forego uploading actual files and upload the form only. The contents of the form become a text file containing all the information from the upload form. This is a rarely used option.
Allow Comment. If checked (the default) a comment field is included in the upload form. If unchecked no comment field will appear on the upload form.
Use Subfolder. If checked (the default) a subfolder under The Customer Upload folder will be created. The name of the subfolder will match the first field in the Customer Upload form (“who are the files from” unless the prompt has been customized). Use Subfolder is recommended as it supports “automatic” sorting of received files by Customer.
Require Password. If unchecked (the default) no password is required to access the Customer Upload form. If checked the password you specify will be required before customers can access the form to upload files. The password will need to be communicated to the customers through separate means.
Customize.When the Customize link is clicked the Customization Wizard is opened to allow form customization or modification.